Sporting goods are just getting to be too darned expensive these days. Magazines and media are quietly preaching consumerism to us, leading many to think that they cannot enjoy the outdoors without spending a fortune on all the latest gadgetry. I say nonsense! To anybody out there who is as fed up with the
nauseatingly stylized and
commercialized industry of outdoor equipment & apparel, I want to encourage you to try making your own wherever possible!
My installment project is a very simple one. Simple but beautiful. I used 2" PVC to create this home made fishing rod tube. It's pretty self-explanatory, really. For those of you budding diy'ers who need a little more instruction, you can
click here to see some other guy who did it, too. All the materials are available at your local hardware store for less than ten bucks. Mine cost an extra $2.50 because I added some extra components (See below).

What's different about mine is that I chose the the ever-more popular black PVC (I haven't let go of style completely yet). Mine needs to accommodate a two-piece fly rod that breaks down to two 50" sections, so it's pretty long. When you make yours, make it to the necessary length to accommodate your gear. If you look at the photo to the left (Click to enlarge) you will notice that I incorporated four couplers to create lash-down points. This way the tube can easily be attached to my backpack as shown. Yes, you too can look like a
redneck ghostbuster! With the straps firmly set into the notches created by the couplers, the tube will not dislodge or slide around. The only issue I can see with this setup is that I am going to snag on any low-hanging trees. I will have to field test this to see how it goes.
It turns out that I am not the first person with this idea. In addition to probably many others who have done this and not written about it on the web,
John Plozizka from San Jose del Cabo, Baja California Sur, Mexico did the same thing on a grander scale, using 4" PVC to transport a larger quantity of rods. I like his idea of using the stickers to personalize his creation. Kind of like how we wore those dorky little buttons in the '80's, to show everyone that we were unique, just like everybody else. Create your own fashion statement, man!
In parting, I ask you to please make sure that you know what you're doing before you try this or any other DIY project. Read the instructions carefully on any adhesives or chemicals before using. And remember to always use PVC for good,
never for evil ;-)
Until next time, stick it to
the man!
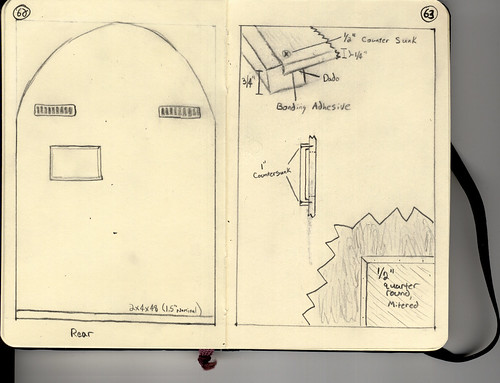
 After enduring much teasing and good-natured derision from Eric I finally got around to snapping some photos of the much-ballyhooed fish house. It's going to get some work this Saturday as I am taking a buddy out for his first ice fishing experience. Weather.com is currently predicting a high of 0 degrees that day so I guess you could call that a baptism by ice. I also took a picture of my auger (Over there, to the left) which I got from my dad when he hung up the jig sticks. It was actually my dad who inspired me to build my own fish house; I have vivid memories of watching him construct his 4' X 8' version when I was a kid.